Introduction
Have you ever found yourself drowning in a sea of server logs, desperately trying to troubleshoot an issue? I’ve been there, wrestling with extension-related problems on my Azure Arc-enabled servers. Each time I reached out to support, they’d ask for logs, and I’d groan at the thought of logging into every single server.
But then I had an idea: What if I could create a script that uses Azure Run Command to collect logs and save them to a storage account automatically? Spoiler alert: I did, and it’s about to make your life a whole lot easier.
Let’s dive into how I turned this idea into reality, and how you can do the same.
The Script: Your New Best Friend for Log Collection
First, let’s take a look at the script that’s about to simplify your log collection process:
This section is reserved for our Premium Members only. Upgrade your membership to access this solution and unlock more benefits.
How it works:
- The script starts by setting up parameters for your storage account and container.
- It then defines functions to
- Collect Azure Arc agent logs
- Acquire a managed identity token
- Upload logs to Azure Storage
- Test storage permissions
- The main execution block
- Starts a transcript for logging
- Test storage permissions
- Collects the logs
- Uploads them to the specified storage account
- Cleans up temporary files
Remember, life’s too short for manual log collection. Say goodbye to the joy of manually collecting logs. What a shame.
Setting Up the Azure Environment
Before running our log collection script, we need to set up the Azure environment. There are two main ways to authenticate and upload logs to a storage account:
- Using the Azure Arc system-assigned managed identity
- Using a Shared Access Signature (SAS) token
In this guide, we’ll use the Azure Arc system-assigned managed identity. This method is more secure as it doesn’t require storing any secrets in your script. However, it does require one extra step: you need to delegate the permissions to the managed identity. This trade-off means a bit more setup work, but it results in a more secure and manageable solution in the long run.
- Create a custom RBAC role
This section is reserved for our Premium Members only. Upgrade your membership to access this solution and unlock more benefits.
This role grants only the permissions needed to upload logs to a blob container. The next steps is to create an Entra ID security group and add the Azure Arc for Servers system-assigned managed identities to that group
- Create an Entra ID security group
- Name it something like “Arc-enabled Servers Log Uploaders”
- Add your Arc-enabled servers as members
- Set up storage account
- Create a storage account for your logs
- Create a container within this account to store the logs
- Assign the custom role
- Assign the “Azure Arc Log Uploader” role to your security group
- Scope it to the storage account container you created before
Running the Script with Azure Run Command
When it comes to executing scripts on Azure Arc-enabled servers, you have two main options:
- Azure Run Command (which we’ll use in this guide)
- Custom Script Extension
While both methods have their merits, we’ll focus on Azure Run Command for this tutorial. Run Command offers more flexibility for ad-hoc script execution.
There are two ways to use Azure Run Command, depending on where your script is located:
Method 1: Script on Your Local Machine
If the script is on your local machine, you can use the Get-Content cmdlet to read the script and pass its content to the remote machine:
This section is reserved for our Premium Members only. Upgrade your membership to access this solution and unlock more benefits.
This method is useful when you want to maintain script versions locally and push updates easily.
Method 2: Script Already on the Remote Machine
If the script is already on the remote machine, you can simply instruct Run Command to execute it:
This section is reserved for our Premium Members only. Upgrade your membership to access this solution and unlock more benefits.
This approach is beneficial when you have a standardized script pre-deployed on all your servers.
The method you choose depends on your management strategy:
- Method 1 – Offers more flexibility for script updates and version control.
- Method 2 – Can be more efficient if you have a standard script that rarely changes and is pre-deployed to all servers.
Both approaches have their place in different scenarios, and you can choose the one that best fits your operational model.
Run Command cmdlet should return the following output: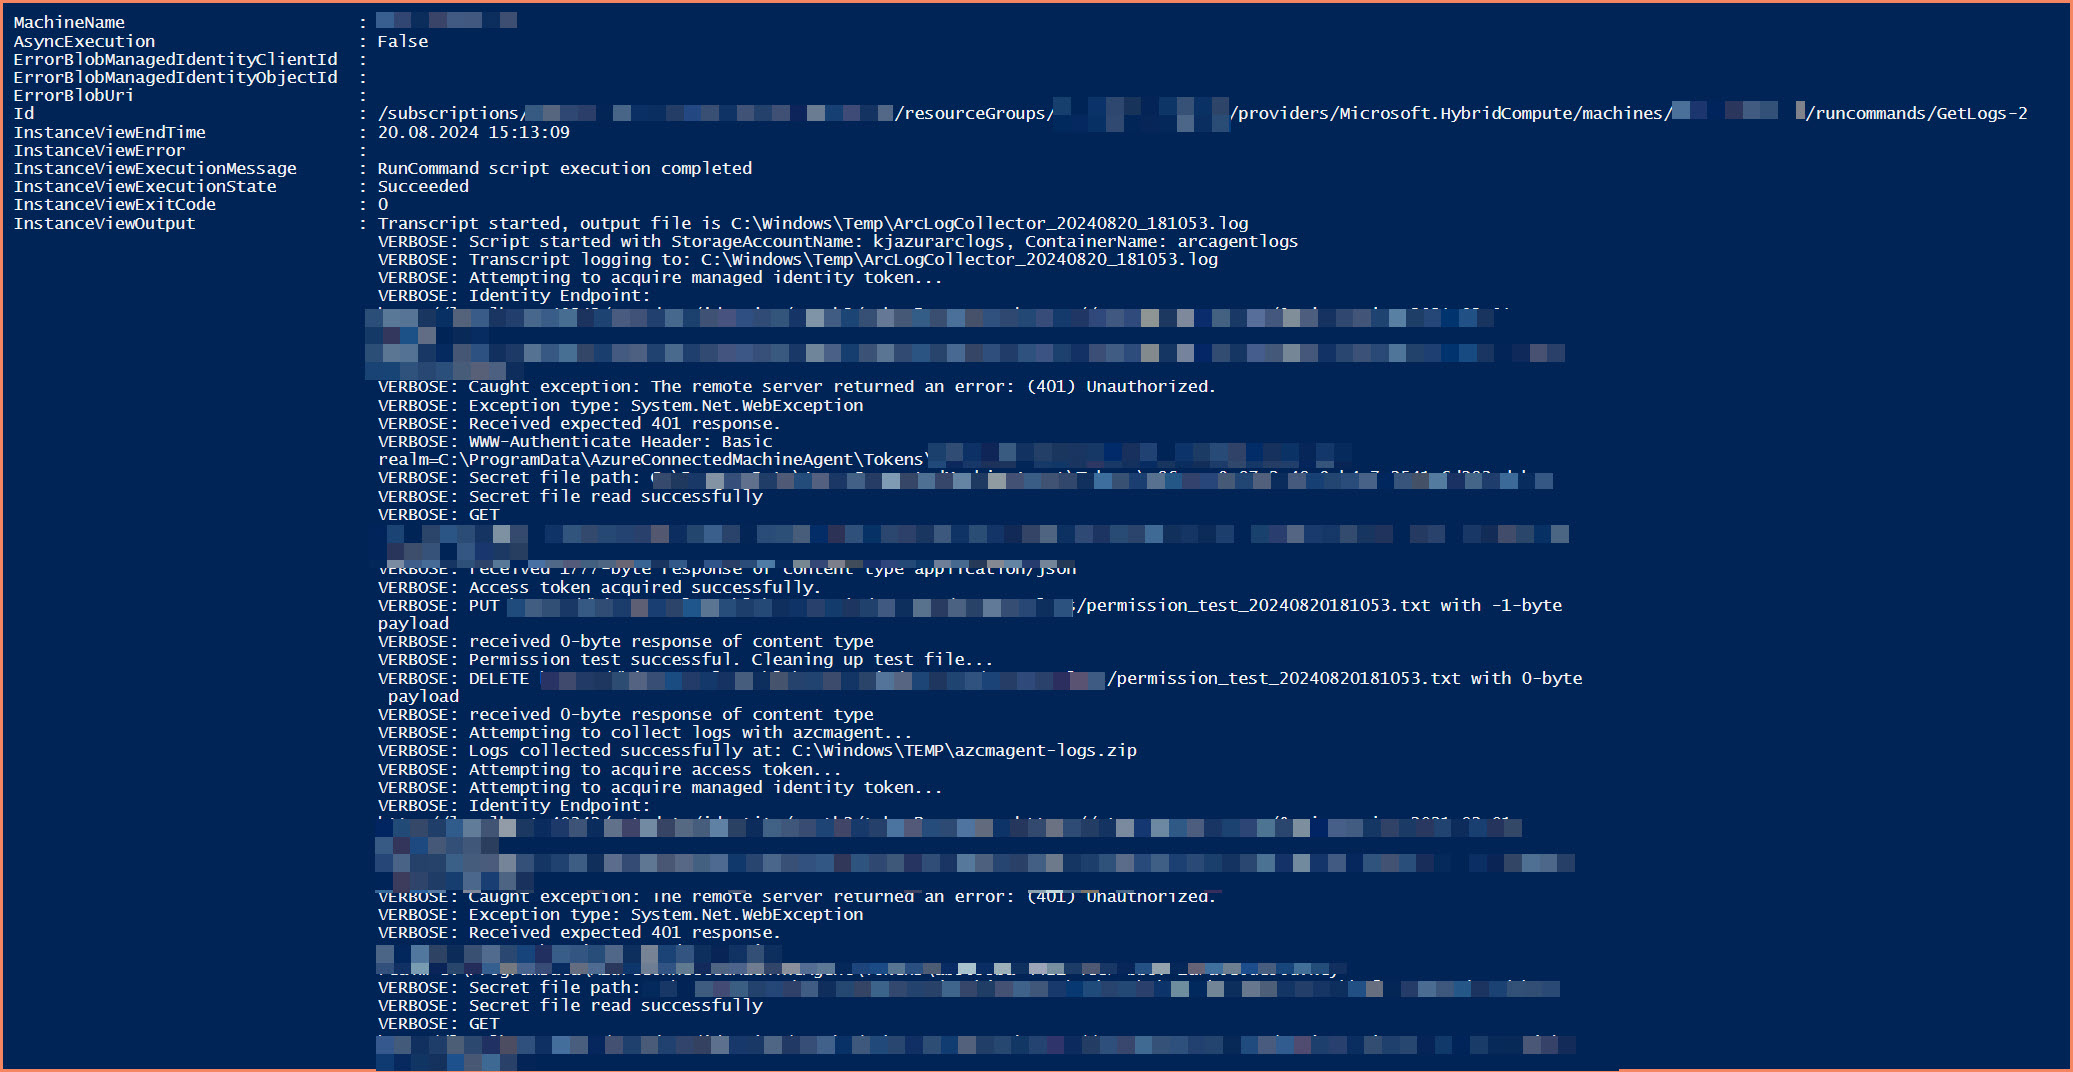
Azure Arc for Servers logs on storage account:
Conclusion
We’ve explored a straightforward method to collect logs from Azure Arc-enabled servers using:
- A PowerShell script utilizing Azure Arc’s system-assigned managed identity
- A custom RBAC role with minimal necessary permissions
- Azure Run Command for remote script execution
This approach offers:
- Better security through managed identities
- Time savings via remote, automated log collection
- Flexibility to suit different management styles
While it requires some initial setup, this method simplifies ongoing log management, especially for multiple servers. It eliminates the need for stored credentials and allows for easy, secure log collection.
Try implementing this on your Arc-enabled servers. It might just make your log collection tasks a whole lot easier.
Ready to take your Azure management skills to the next level?
Check out our Premium blog posts and offers for advanced Azure techniques and expert insights.